




Can a Corroded Circuit Board Be Cleaned, or Is the Damage Permanent?
A corroded circuit board can often be cleaned when the visible problem is loose residue, dried liquid, or light surface oxidation. Cleaning cannot put copper back into a trace, rebuild a plated-through hole, restore a lifted pad, or repair a component whose lead has been eaten away.
That distinction is the starting point. The green, blue, white, or black material you see may be contamination sitting on the metal, a reaction product made from the metal, or evidence that some of the metal is already gone. Removing the residue lets you inspect the board; it does not prove the board is electrically sound.
Use this working rule:
- Clean when residue is superficial and the copper, pads, vias, leads, and substrate remain intact.
- Repair after cleaning when a trace is open, a pad is loose, a connector is pitted, or a component lead is damaged.
- Replace or escalate when the board is carbonized, delaminated, damaged under inaccessible packages, connected to a hazardous battery, or used in a safety-critical product.
If you are not sure whether the visible mark is corrosion or another defect, the broader guide on how to tell if a PCB is damaged explains the visual and electrical warning signs that should be checked before repair.
What Are You Actually Looking At: Corrosion, Flux, or Dried Residue?
Do not choose a cleaner from color alone. White material can be dried battery electrolyte, an ionic spill residue, flux-related residue, or a cleaning reaction. Green-blue material often involves copper compounds, but it does not reveal how deeply the copper has been attacked.
Start with the event history. Ask what touched the board, whether power was present, how long the board stayed wet, and whether the residue began near a battery, connector, leaking capacitor, liquid-entry point, or reworked solder joint.
| What you observe | Likely starting hypothesis | What to verify before cleaning |
| White crust near AA/AAA cells | Leaked battery electrolyte or its reaction products | Battery chemistry and how far residue traveled under parts |
| Green-blue deposits on exposed copper | Copper corrosion after moisture, salt, or chemical exposure | Whether copper is merely stained, pitted, thinned, or missing |
| Sticky amber or brown film near solder joints | Flux or process residue | Flux type and approved cleaning process |
| White haze after a previous cleaning attempt | Partly dissolved residue or cleaner/material reaction | Which cleaner was used and whether the deposit is water- or solvent-soluble |
| Blackened laminate or charred copper | Electrical or thermal damage, not a cleaning problem | Root cause, insulation damage, and whether the board must be replaced |
| Residue under a shield, BGA, QFN, or connector | Hidden contamination is possible | Whether the part can be removed or professionally cleaned and dried |
A small spot test may help a trained technician classify process residue, but never run chemistry experiments on an assembled board when the contaminant is unknown. Cleaner compatibility with the solder mask, conformal coating, plastics, adhesives, labels, seals, and component packages must also be known.
When Should You Stop Before Cleaning the Board?
Stop before cleaning when the board presents a battery, high-voltage, chemical, or reliability hazard that a bench cleaning cannot control. Disconnecting a plug is not always enough because batteries and large capacitors can keep a circuit energized.
Do not continue as a normal DIY cleaning job if any of these conditions apply:
- A lithium-ion cell is swollen, hot, hissing, leaking, smoking, or giving off an unusual odor.
- The device contains mains voltage, a high-voltage power supply, a flash capacitor, an inverter, an EV battery section, or another stored-energy source you are not trained to discharge.
- The contaminant is an unknown industrial chemical, bodily fluid, pesticide, coolant, or other hazardous material.
- The laminate is burned, carbonized, soft, blistered, or separating into layers.
- Corrosion extends under a large package or shield that cannot be inspected and dried.
- The board controls a medical, fire-safety, vehicle-safety, aviation, high-power, or other safety-critical function.
Isopropyl alcohol is flammable and can irritate the eyes, skin, and respiratory system. Work with ventilation, eye protection, suitable gloves, and no flame, spark, hot plate, or energized equipment nearby. The CDC/NIOSH isopropyl alcohol guidance provides the underlying chemical-safety information.
What Tools and Cleaners Should You Prepare?
Prepare a small set of controlled tools rather than a tray of household chemicals. The aim is to loosen and carry contamination away while applying as little liquid and mechanical force as the board requires.
- Safety glasses and cleaner-compatible gloves
- ESD-safe work surface and handling tools
- Bright light and magnification
- Soft ESD-safe brush, foam swabs, and lint-free wipes
- Fresh electronics-grade cleaner selected for the known contamination
- High-purity IPA when it is compatible and appropriate
- Deionized or distilled water only for a controlled water-soluble-contamination process
- Clean containers for fresh and used swabs so dissolved material is not spread back onto the board
- Multimeter with sound probes and known-good leads
- Current-limited bench supply only for a trained, later-stage power-up
Avoid steel brushes, coarse abrasives, metal scrapers around fine traces, tap water, unknown household cleaner, acetone on assembled electronics, heat guns, and uncontrolled compressed-shop air. A household toothbrush may be mechanically soft, but a dedicated ESD-safe brush is the more controlled choice around static-sensitive parts.
Which Cleaner Matches the Contamination Source?
The correct cleaner is chosen by what must be removed and what the assembly can tolerate, not by how dramatic the corrosion looks. IPA is common in electronics work, but it is not a universal corrosion remover and does not rebuild metal.
| Known source | Practical cleaning direction | Main boundary |
| Light oil, fingerprints, some organic or flux-related residue | Use a compatible electronics cleaner or high-purity IPA with a soft brush/swab | Confirm plastics, coatings, adhesives, and flux type |
| Water-soluble ionic residue | Use a controlled deionized-water or approved aqueous process, then rinse and dry completely | Water can remain under low-clearance parts; drying capability is part of the process |
| Known alkaline battery leakage | Follow the battery maker’s leak instructions; use a minimal local weak-acid treatment only when chemistry and compatibility are confirmed | Remove all reaction products and cleaner residue afterward |
| Salt water or salty residue | Remove soluble salts with a controlled aqueous rinse before final compatible cleaning and drying | IPA alone may not remove all ionic salts |
| Sugary drink, juice, or other mixed spill | Remove water-soluble contamination first; repeat with fresh rinse rather than spreading dissolved residue | Acids, sugars, colorants, and salts may be trapped under components |
| Unknown chemical or unknown battery | Isolate the item and obtain the product/SDS or professional guidance | Do not guess whether acid, alkali, solvent, or water is appropriate |
The cleaner also needs a removal step. Dissolving contamination and letting the dirty liquid evaporate in place can leave the contamination on the board in a different pattern. Use fresh cleaner, swabs, or a controlled rinse to carry the material off the assembly.
How to Clean a Corroded Circuit Board Step by Step
Use the following sequence only after the board is fully de-energized, the contamination is identified well enough to choose a compatible method, and none of the stop conditions applies.
Step 1: Isolate every power source.
Unplug external power, remove detachable batteries, and follow the service procedure for stored energy. Do not probe or brush the board while it is energized.
Step 2: Photograph and document the board.
Capture both sides, connectors, cable orientation, corrosion boundaries, and nearby components. These images preserve evidence that may disappear during cleaning and help with reassembly.
Step 3: Remove the board only as far as the service procedure allows.
Open connectors correctly and avoid pulling flex cables or scraping nearby parts. Remove shields only when the design allows them to be removed and reinstalled safely.
Step 4: Lift loose dry material gently.
Use a soft brush while controlling where the particles go. Do not drive powder under packages or into connectors. Corroded copper can be thin and fragile, so pressure that is harmless on a new board may lift a damaged trace.
Step 5: Apply the matched cleaner in a small area.
Dampen the brush or swab rather than flooding the assembly. Work under magnification and let the cleaner loosen the material. Replace dirty swabs instead of moving residue around.
Step 6: Rinse or lift away dissolved contamination.
Use the compatible final rinse for that contamination and assembly. Keep moving dissolved material off the board until a fresh swab or rinse no longer picks up residue.
Step 7: Dry the board completely.
Remove visible liquid with a lint-free wipe and controlled clean airflow where appropriate. Give trapped liquid under connectors and bottom-terminated packages a real path and enough time to leave. Do not substitute a fixed number of hours for inspection.
Step 8: Inspect before making an electrical decision.
Cleaning is complete only when you can see the metal and board surface well enough to judge them. Do not reinstall or power the board merely because the stain is gone.
How Should Alkaline Battery Leakage Be Cleaned?
First confirm that the leaking cells are alkaline, NiCd, or NiMH and follow the battery manufacturer’s cleanup instructions. The crust from a common alkaline cell is often mistakenly called “battery acid,” but alkaline cells can release strongly caustic alkaline material.
Energizer identifies potassium hydroxide in its alkaline battery safety information and warns that leakage is caustic. Duracell’s battery-leak FAQ recommends gloves, eye protection, ventilation, and a diluted weak-acid cleanup for specified battery types. That does not mean an entire populated PCB should be soaked in vinegar.
- Remove and isolate the leaking cells without touching residue with bare skin.
- Photograph the leak path from the battery contact toward the board.
- Dry-lift loose crystals while wearing eye and hand protection.
- Apply the battery maker’s recommended solution locally with a swab only after confirming the cell chemistry and material compatibility.
- Remove the reaction products and all remaining cleaning solution with a compatible controlled rinse.
- Dry, inspect, and test the battery contacts, nearby vias, traces, and component leads.
If the battery type is unknown, do not alternate vinegar, baking soda, and alcohol until something appears to work. Opposite chemicals can create heat, residues, or new material damage, while the original contamination may remain under components.
What Changes After Water, Salt Water, or Sugary Liquid Exposure?
The liquid’s dissolved material matters more than the word “water.” Clean deionized water, tap water, sea water, soda, coffee, juice, and coolant leave very different residues after evaporation.
- Tap water: may leave minerals and ions; remove the residue rather than only drying the board.
- Salt water: leaves highly mobile ionic contamination and can continue attacking metal; a controlled water-compatible rinse is usually needed before drying.
- Sugary or acidic drinks: can leave sticky, hygroscopic, and corrosive deposits under connectors and packages.
- Unknown industrial liquid: may require an SDS, manufacturer procedure, or specialist decontamination.
Power accelerates damage when conductive liquid bridges nodes. Turn the device off and remove the battery rather than trying one more power-on “to see if it still works.” The iFixit liquid-damage guide also emphasizes immediate power isolation, access to contaminated areas, soft brushing, and complete drying.
Which Parts Should Not Be Soaked or Flooded?
Do not assume that every item soldered to a PCB tolerates the same liquid exposure as the bare laminate. A cleaner may be harmless to cured solder mask but damage a seal, lubricant, adhesive, membrane, optical surface, or internal mechanical contact.
Unless the component or equipment documentation approves the process, avoid soaking or flooding:
- Battery cells and battery packs
- Displays, camera modules, optical sensors, and lenses
- Microphones, speakers, buzzers, and other acoustic parts
- Relays, switches, potentiometers, encoders, and trim components with internal contacts or lubricants
- Transformers, inductors, and wound parts that can trap liquid
- MEMS sensors, crystals, and other mechanically sensitive packages
- Connectors with seals, grease, paper inserts, or inaccessible cavities
- Labels, insulating films, foams, adhesives, and conformal coatings of unknown chemistry
Ultrasonic cleaning is not a shortcut around this compatibility check. It requires a validated liquid, frequency, exposure, component set, rinse, and drying process. For a one-off valuable board, professional component-level repair may be less risky than experimenting with immersion.
How Do You Inspect Traces, Pads, Vias, and Connectors After Cleaning?
Inspect the cleaned area under bright magnification and follow the damage outward from the original contamination. The purpose is to find missing metal and compromised interfaces, not merely confirm that the board looks less dirty.
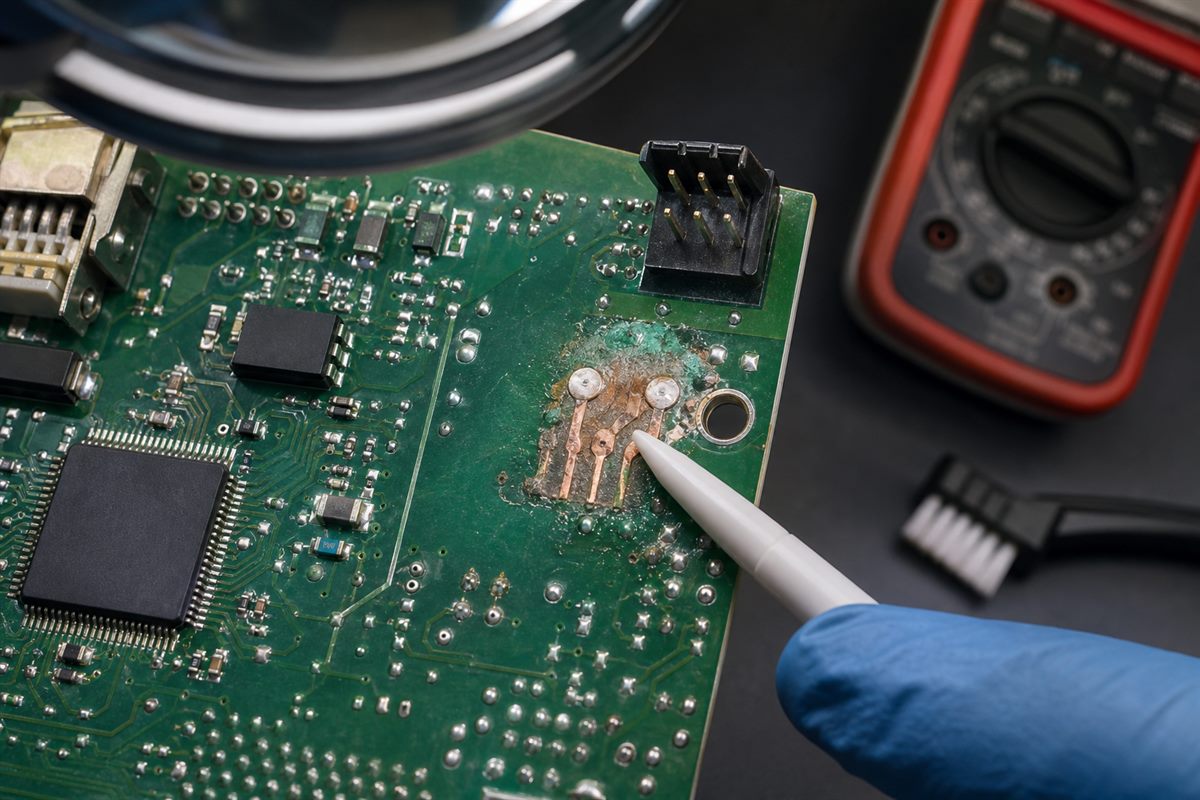
- Traces: look for narrowing, dark pits, cracks, undercut edges, or sections that move when touched with a nonconductive probe.
- Pads: check whether each pad remains bonded to the laminate and connected to its trace or via.
- Vias: inspect both ends for a complete annular ring, intact barrel appearance, and no green/black material emerging from the hole.
- Component leads: look for missing plating, thinned pins, cracked solder, or corrosion continuing under the package.
- Connectors and contacts: inspect contact plating for pitting and loss of spring force; cleaning cannot restore missing plating.
- Laminate: reject carbonized, blistered, swollen, soft, or delaminated areas.
Compare suspicious areas with photos, the same circuit on an undamaged section, a known-good board, or design files. For an open or thinned conductor, use the separate PCB trace repair guide rather than covering the area and hoping the cleaned copper will remain reliable.
How Do You Test the Board Before Applying Power?
Begin with unpowered checks that can find opens and obvious shorts without adding energy to a damaged circuit. There is no universal resistance number that proves every board is safe; expected readings depend on the circuit and may change while capacitors charge from the meter.
- Verify isolation. Confirm the battery and external supply are disconnected.
- Check the meter and leads. Short the probes together so you know the lead resistance and continuity behavior.
- Trace suspicious conductors. Measure from sound copper or a component terminal on one side of the damaged area to the corresponding point on the other side.
- Check adjacent nets. Confirm that cleaned neighboring pads or traces are not unintentionally bridged.
- Check the power input. Compare resistance or diode-mode behavior between input rails and ground with a schematic, service manual, known-good board, or previous baseline.
- Inspect while measuring. A reading that changes when a connector or corroded part is lightly moved suggests an intermittent interface that cleaning did not solve.
A continuity beep confirms only that the meter found a path below its own threshold. It does not prove that a thinned trace can carry operating current or that a connector will remain stable. The broader PCB testing sequence and pass/fail guide explains how continuity, resistance, voltage, and functional checks answer different questions.
How Do You Perform a Controlled Power-Up?
Only a trained person who knows the board’s voltage, polarity, expected current, and safe test points should perform a controlled power-up. Use the original protected supply or a correctly configured current-limited bench supply; never guess the voltage from connector shape.
- Reconnect only the minimum hardware needed for the first functional check.
- Set the correct voltage and a conservative current limit based on verified design information, not an arbitrary internet value.
- Watch the initial current behavior and compare it with a known-good board or service data when available.
- Stop immediately if current hits the limit unexpectedly, a part heats, voltage collapses, an odor appears, or behavior is unstable.
- If the first power check is normal, test the functions associated with the corroded area before full reassembly.
Do not use finger temperature checks on an energized board. Thermal inspection tools and safe probing methods are more appropriate. One successful boot also does not prove long-term reliability; intermittency, humidity sensitivity, and pitted connectors may require further testing.
Should You Clean, Repair, or Replace the Board?
Make the decision from the remaining structure and test evidence, not from the board’s cosmetic appearance after cleaning.
| Finding after cleaning | Likely action | Evidence needed before return to service |
| Residue gone; copper, pads, vias, and leads intact | Dry, inspect, test, and monitor | No unintended shorts, expected continuity/resistance, normal controlled power-up |
| One accessible trace is open or badly thinned | Qualified trace repair may be possible | Mechanical support, electrical continuity, current-capacity check, functional test |
| Pad lifted but an alternate connection point is known | Component-level repair by a skilled technician | Correct net connection, strain relief, solder quality, functional test |
| Connector plating is deeply pitted | Replace the connector/contact | Contact resistance and mating reliability |
| Corrosion extends under BGA/QFN/shield with no access | Professional cleaning, rework, or replacement | Inspection access and suitable process validation |
| Carbonized laminate, damaged internal layers, many missing vias/traces | Replace or redesign the board | New-board manufacturing and full assembly/test release |
| Board is safety-critical and damage history is uncertain | Use the approved service/replacement path | Application-specific qualification and traceable acceptance |
A repaired prototype can be useful for diagnosis, but the acceptance decision for field use or production should match the product’s consequence of failure. A remote control and an isolation monitor should not share the same repair threshold.
Corroded Circuit Board Cleaning Checklist
Use this checklist at the bench so a clean-looking surface does not make you skip the checks that determine whether the board is actually usable.
- All external and stored power isolated
- No swollen, hot, leaking, smoking, or damaged lithium battery
- Contamination source and battery chemistry identified where possible
- Before photos saved
- Cleaner and board/component compatibility confirmed
- Loose material removed without spreading it under parts
- Dissolved contamination carried off with fresh swabs or a controlled rinse
- No cleaning residue or trapped liquid remains
- Traces, pads, vias, component leads, connectors, and laminate inspected
- Suspicious traces checked end to end
- Adjacent nets checked for unintended bridges
- Power-to-ground readings compared with valid design or known-good evidence
- Controlled power-up performed only by a qualified person
- Abnormal current, heat, odor, or instability treated as a stop signal
- Root cause corrected before coating, reassembly, or return to service
Frequently Asked Questions
Can I use 70% isopropyl alcohol on a circuit board?
It may clean some compatible surfaces, but its higher water content slows drying and may be less suitable for trapped areas. Many electronics-repair procedures prefer 90% or higher IPA. Concentration alone does not prove compatibility or cleaning effectiveness, so confirm the component, coating, and contamination before use.
Does isopropyl alcohol remove circuit board corrosion?
IPA can loosen some residue, oils, flux-related contamination, and displaced liquid, but it is not a universal remover for ionic salts or metal corrosion products. More importantly, it cannot restore copper or plating that corrosion has already removed.
Is white vinegar safe for a corroded circuit board?
Not as a universal cleaner. A battery maker may recommend diluted weak acid for confirmed alkaline, NiCd, or NiMH leakage, usually applied locally to contacts. On an unknown assembly or unknown contaminant, vinegar can create new residue or material damage. Confirm the chemistry and remove all cleaner afterward.
Can baking soda clean battery corrosion on a PCB?
Baking soda is a weak base and an abrasive. It is not a logical universal neutralizer for the strongly alkaline leakage from common alkaline cells, and paste can lodge under parts. Identify the battery chemistry and follow its manufacturer’s leak-cleanup instructions instead of relying on a generic paste.
How long should a circuit board dry before power is applied?
There is no reliable universal time. Drying depends on the liquid, board density, connectors, bottom-terminated components, airflow, temperature limits, and humidity. Power should remain off until no liquid is visible or trapped and the relevant service process says the assembly is dry enough to test.
Can I use a hair dryer or heat gun?
A heat gun can overheat laminate, plastics, adhesives, seals, and components. A hair dryer can add heat, static, dust, or contaminated airflow. Use a validated low-temperature drying method within component limits; cold, clean, controlled airflow may be appropriate for some assemblies.
Will corrosion return after cleaning?
It can return if ionic residue, moisture, a leaking battery, damaged solder mask, enclosure leakage, or another root cause remains. Reinspect the board after cleaning and correct the exposure path before adding conformal coating or closing the enclosure.
Can I apply conformal coating immediately after cleaning?
Only after the board is clean, completely dry, repaired, and electrically verified. Coating over contamination or moisture can trap the cause of failure and make later repair harder. The coating chemistry and masking plan must also match the assembly.
When is professional repair the better choice?
Use professional repair for high-voltage or safety-critical equipment, valuable multilayer boards, corrosion under dense packages, damaged pads or vias, unknown chemicals, or any case where the correct cleaner, drying method, schematic, or test limits are unavailable.
What should I send if the board must be remade?
Prepare the Gerber or ODB++ data, NC drill files, stackup and fabrication drawing, BOM, CPL/pick-and-place file, assembly drawings, firmware/programming needs, test requirements, quantity, and clear photos of the failed board. These inputs let a manufacturer separate a replacement build from a repair guess.
If cleaning reveals missing copper, damaged vias, carbonized laminate, or an uneconomical repair, a replacement PCB or PCBA may be the more reliable path. For a manufacturing review, send PCBtry the Gerber/ODB++ data, drill files, stackup, BOM, CPL, assembly drawings, quantity, test requirements, and failure photos through the contact page. The team can review a replacement build or redesign; consumer-device repair and hazardous battery handling should remain with a qualified service provider.



0 Comments