




Choose the classic Arduino Nano when you want a compact, predictable 5 V controller for straightforward sensing and control. Choose an ESP32 development board when the project needs built-in Wi-Fi or Bluetooth, substantially more processing and memory, or several software tasks running together. That answer changes if “Nano” means a Nano Every, Nano 33, or Nano ESP32, or if “ESP32” means an S3, C3, C6, or another board. Compare exact part numbers before wiring or ordering.
This guide uses the classic ATmega328P-based Arduino Nano and an ESP32-DevKitC-class board built around the original ESP32 family as the baseline. It explains where that comparison is useful, where it breaks, and which requirements should decide your prototype.
Quick Verdict: Choose by Project Constraint
| Project constraint | Better starting point | Why |
|---|---|---|
| Existing 5 V logic modules | Classic Arduino Nano | Its MCU and I/O operate at 5 V; compatibility still must be checked per module |
| Built-in Wi-Fi or Bluetooth | ESP32 board | Wireless functions are integrated into the ESP32 platform |
| Small, simple control loop | Classic Arduino Nano | An 8-bit AVR and small software stack can be easier to understand and verify |
| Web UI, networking, audio, or concurrent tasks | ESP32 board | More CPU, memory, peripherals, and an RTOS-based software environment |
| Drop-in Nano footprint plus ESP32 features | Arduino Nano ESP32 | It combines the Nano form factor with an ESP32-S3-based module, but uses 3.3 V I/O |
| Strict low-power target | Measure both candidates | Regulators, USB bridges, LEDs, radio state, firmware, and wake cycle determine total board energy |
The ESP32 wins most raw capability comparisons, but unused capability is not free: it can add voltage-domain work, wireless current peaks, more complex timing, larger firmware, and more configuration. The Nano wins when those additions do not solve a real requirement.
Baseline: Classic Nano vs an ESP32 Dev Board
“Arduino” is a hardware and software ecosystem, while ESP32 is a family of microcontrollers from Espressif. “Nano” is now a family name. The classic Nano uses an ATmega328P-compatible AVR design; Nano Every uses an ATmega4809; Nano 33 models use other 32-bit MCUs; and Nano ESP32 contains an ESP32-S3-based module. Some Nano boards therefore have more in common with modern ESP32 boards than with the classic Nano.
ESP32 boards vary too. The original ESP32, ESP32-S2, S3, C3, C6 and other families use different cores, radios, peripherals, GPIO maps and security features. Development boards expose different subsets of the SoC pins and use different regulators, USB interfaces, LEDs and antenna layouts.
For a valid purchase decision, write both exact names—for example, “Arduino Nano A000005” and “ESP32-DevKitC with a specified module”—then open their pinout, schematic and datasheet. Do not copy a generic pin count into a PCB before checking which pins the board exposes and which have boot, flash, input-only, radio, ADC, or strapping restrictions.
Arduino Nano vs ESP32 Comparison Table
| Feature | Classic Arduino Nano baseline | Original ESP32 / DevKitC-class baseline | Design meaning |
|---|---|---|---|
| Processor | 8-bit AVR ATmega328P, 16 MHz | 32-bit Xtensa LX6, single- or dual-core variants up to 240 MHz | ESP32 supports heavier and concurrent workloads; clock alone is not an application benchmark |
| Program/data memory | 32 KB flash, including bootloader use; 2 KB SRAM; 1 KB EEPROM | ESP32 SoC includes 520 KB SRAM; module flash varies | Libraries, buffers, networking, JSON and web pages fit more readily on ESP32 |
| Logic voltage | 5 V | 3.3 V | Direct signal compatibility cannot be assumed |
| Wireless | None built in | 2.4 GHz Wi-Fi plus Bluetooth/Bluetooth LE on original ESP32 | Nano needs an external radio and supporting power/interface design |
| Analog | Eight analog inputs on the official Nano board | Multiple 12-bit SAR ADC channels at SoC level, subject to pin and operating restrictions | Resolution count does not establish accuracy; validate the real signal chain |
| Interfaces | UART, SPI and I2C; six PWM outputs in the official specification | Multiple UART, SPI, I2C, I2S, PWM and other peripherals depending on variant and pin routing | Count only interfaces and pins usable together on the chosen board |
| Software model | Simple Arduino AVR environment | Arduino core or ESP-IDF, commonly using FreeRTOS underneath | ESP32 enables concurrency but requires more attention to tasks, callbacks and shared state |
| Board format | Official board is 18 × 45 mm | Varies by development board | Compare mechanical drawings, antenna keep-out and connector access |
The figures above are family baselines from official documentation, not promises for every clone or revision. A low-cost “Nano-compatible” board can use a different USB bridge or regulator. An ESP32 board can expose fewer GPIOs than the SoC datasheet lists.
Processing and Memory: Capability vs Simplicity
The classic Nano’s 16 MHz AVR, 2 KB SRAM and 32 KB flash encourage compact, single-purpose firmware. It is a good fit for reading switches, simple analog sensors, generating control signals, updating a small display, or driving a modest state machine. Direct register access and short interrupt paths are well documented, and memory use is easy to see because the limits are close.
The original ESP32 offers a 32-bit processor, much more SRAM, higher clock rates, wireless stacks and a broad peripheral set. It can host a local web interface, buffer network data, parse larger messages, stream samples, or separate communications from control tasks. It also introduces caches, tasks, radio events, dynamic memory and a larger software stack. A blocking loop copied from AVR code can interfere with network servicing or watchdog expectations.
Do not infer timing determinism from clock speed. If a motor, pulse counter or safety-relevant output needs a bounded response, identify whether the function belongs in hardware peripherals, an interrupt, a high-priority task, or a separate controller. The best board is the one whose timing behavior you can verify.
GPIO and Analog: The 5 V-to-3.3 V Migration Risk
The classic Nano operates at 5 V. ESP32 GPIO uses a 3.3 V domain and should not receive a 5 V signal unless the exact device documentation explicitly permits it. Use a suitable level shifter, divider, buffer, transistor interface, or 3.3 V-compatible peripheral as the signal type requires. I2C, SPI, UART, PWM, one-wire buses and analog signals do not all use the same conversion circuit.
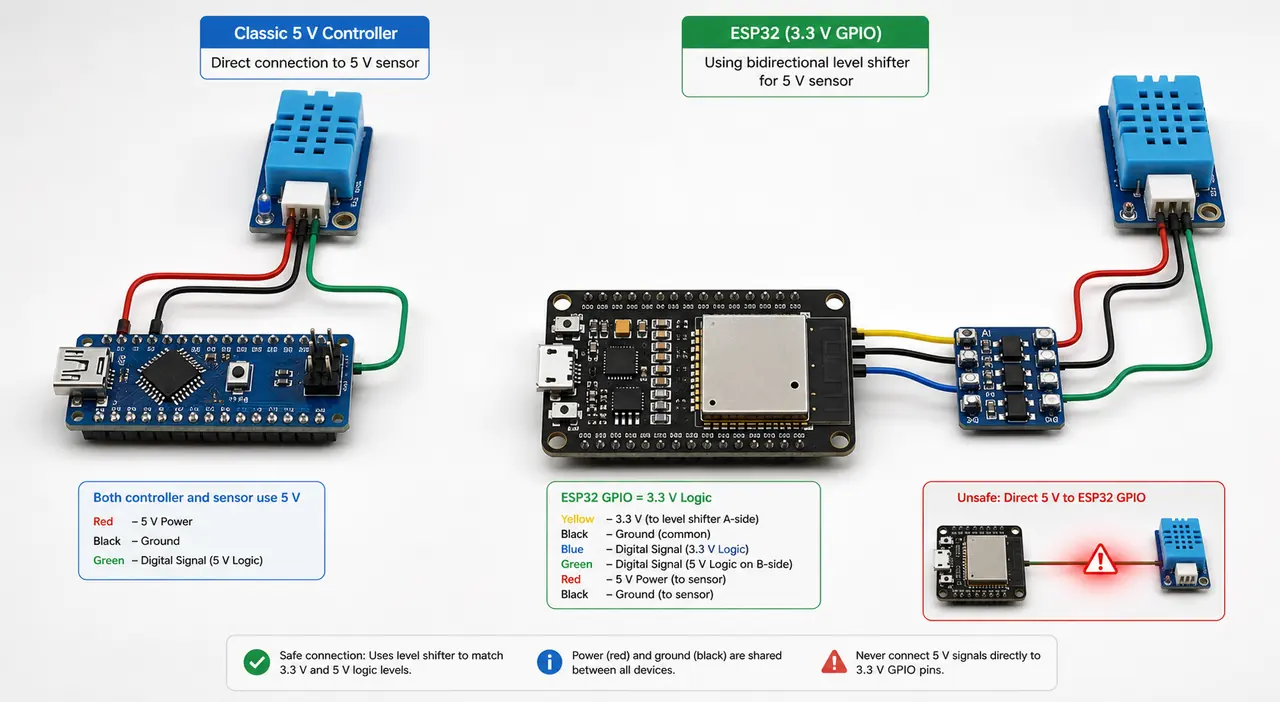
Analog comparison needs similar care. The Nano’s ADC and ESP32’s ADC differ in reference behavior, resolution, attenuation, calibration, linearity, input range and interaction with other functions. A nominally higher resolution does not guarantee a more accurate measurement. Define sensor output range, source impedance, bandwidth, error budget, sampling timing and calibration method, then test the chosen board and configuration.
Pin labels are also not interchangeable. ESP32 pins can have boot-strapping roles, input-only behavior on some variants, or conflicts with flash, PSRAM, radio, ADC blocks or board-mounted devices. Before building a carrier, verify the PCB connections, pads and connectors against the exact board pinout.
Wireless and Interfaces: Built In vs Added Modules
The original ESP32 integrates Wi-Fi and Bluetooth/Bluetooth LE, which makes it a natural choice for dashboards, phone control, wireless sensors, provisioning and gateways. It also provides more serial and specialized peripherals than the classic Nano at the SoC level. The usable combination still depends on the selected chip, module, board and pin map.
A classic Nano can communicate wirelessly through an external ESP, BLE, LoRa, cellular or other module. That architecture can be valuable when a simple controller should remain isolated from a replaceable modem. It consumes board space, pins and power, and creates a protocol and voltage interface that must be designed and tested.
If all you need is one reliable UART or I2C link and a small deterministic loop, an external radio may be unnecessary. If wireless is the product, integrating it from the start usually produces a cleaner prototype.
Power: Compare the Whole Board, Not One Sleep Number
Power tables are frequently misleading. Espressif documents chip power modes, including deep sleep, but a development board also contains a regulator, USB interface, indicator LEDs and other leakage paths. Wi-Fi and Bluetooth create active current peaks, and battery life depends on connection time, transmit power, retries, sensor load and wake frequency.
The classic Nano has no radio but its official board was not designed solely as an ultra-low-leakage product. The regulator, USB interface and power LED remain part of the energy budget. A modified board, bare MCU, purpose-built module design, or a newer low-power board can behave very differently.
Use an energy budget rather than a winner label:
- List every operating state and its duration.
- Measure the complete prototype at the battery input.
- Include startup, radio association, transmission, sensor warm-up and regulator loss.
- Check peak current against the battery, regulator, decoupling and wiring.
- Repeat at temperature and battery end-of-life voltage if the product requires it.
Code Porting: What the Shared Arduino API Does Not Guarantee
Both boards can be programmed with Arduino-style functions, but source compatibility is not hardware compatibility. Before moving a Nano sketch to ESP32, inspect these assumptions:
- hard-coded pin numbers and direct AVR register access;
- 5 V sensors, pull-ups and analog input ranges;
- timer, PWM frequency, interrupt and delay behavior;
- EEPROM size and persistence APIs;
- library support for the selected ESP32 core and chip variant;
- data types, memory use, concurrency and callback context;
- watchdogs, boot pins and reset behavior;
- serial port assignment, USB implementation and upload method.
Compile success is only the first check. Verify startup, outputs, communications, analog measurements, error recovery and long-duration operation. PCBtry’s guide to flashing a PCB and verifying firmware provides a useful production-oriented boundary between programming and functional confirmation.
Project Decision Matrix: Which Board Fits?
| Project | Classic Nano fit | ESP32 fit | Selection check |
|---|---|---|---|
| Simple 5 V sensor/controller | Strong | Possible with interface review | Does wireless or extra processing create value? |
| Wi-Fi environmental node | Needs external radio | Strong | Can the power source support radio peaks and required battery life? |
| Motor or pulse timing plus cloud link | Strong for simple control; needs gateway | Can do both if timing is engineered | Should control and networking be separated? |
| Web configuration panel | Impractical without added hardware | Strong | Are memory, security and update requirements defined? |
| Existing Nano carrier or shield | Strong baseline | Nano ESP32 may fit mechanically | Are pin functions and 3.3 V I/O electrically compatible? |
| High-quality analog measurement | Requires signal-chain validation | Requires signal-chain validation | Would an external ADC provide a clearer error budget? |
A published Oregon State University engineering project provides a useful bounded example. Its team considered ESP32 alongside Arduino Nano-class options under a combined component budget and needed several functions—such as LEDs, a display and a speaker—to operate together. The report selected ESP32 for library availability, greater computing capability, dual-core flexibility and supported interfaces. That result supports ESP32 for that documented concurrent workload; it does not prove ESP32 is superior for every simple controller or that dual-core firmware is automatically correct.
Prototype to Custom PCB: Different Integration Work
A development board proves firmware and interfaces quickly, but it may be too large, costly, power-hungry or mechanically awkward for production. There are three common next steps:
- Carrier PCB: socket or solder the complete Nano or ESP32 development board onto a custom baseboard. This reduces RF design risk but retains the dev board’s cost, height and power circuitry.
- Module-based PCB: use a certified or pre-qualified ESP32 module and design power, reset, boot, USB, antenna keep-out and connectors around it. Follow the module and Espressif hardware guides.
- Bare-MCU PCB: integrate the ATmega328P or ESP32 SoC directly. This gives maximum control but adds clock, programming, power, RF and manufacturing responsibilities.
For every route, identify components from their exact documentation rather than appearance; see how to identify PCB components. For an ESP32 antenna, respect placement and keep-out requirements. Provide test points for power, reset, programming and communications, and plan how production units will be flashed and tested.
Pre-Build Selection Checklist
- Name the exact official or third-party board revision.
- List every peripheral’s supply and logic voltage.
- Count simultaneously usable pins and interfaces, not headline GPIO.
- Define CPU workload, worst-case timing and memory buffers.
- State whether Wi-Fi, Bluetooth or another radio is mandatory.
- Create a whole-board energy budget and measure peak current.
- Review ADC accuracy, range, calibration and source impedance.
- Audit libraries, timers, interrupts, storage and pin assumptions before porting.
- Choose carrier, module or bare-MCU integration for the production PCB.
- Define programming, functional test, recovery and update methods.
Turning the Prototype Into a PCB?
Send PCBtry the chosen board or module, schematic, pin map, voltage domains, antenna requirements, connectors, mechanical limits and test plan. We can review the PCB fabrication and assembly requirements. Final microcontroller and RF-module selection remains tied to your verified product requirements and the component manufacturer’s current documentation.
Frequently Asked Questions About Arduino Nano vs ESP32
Is ESP32 better than Arduino Nano?
ESP32 has much more processing, memory and built-in wireless capability than the classic Nano. The Nano can still be the better engineering choice for a small 5 V control task that does not need those features.
Can ESP32 replace an Arduino Nano directly?
Not as a universal drop-in replacement. Check footprint, pin mapping, 3.3 V versus 5 V logic, power input, libraries, timers, analog behavior and boot pins. Arduino Nano ESP32 shares the Nano form factor but is not electrically identical to the classic Nano.
Can I program ESP32 with the Arduino IDE?
Yes, using the supported Arduino core and the correct board package. Arduino-style APIs help portability, but hardware-specific code and libraries still need review.
Does Arduino Nano have Wi-Fi or Bluetooth?
The classic ATmega328P Nano does not. Some newer Nano-family boards do, including Nano ESP32. Always use the complete board name.
Are ESP32 pins 5 V tolerant?
Do not assume so. Design ESP32 GPIO as a 3.3 V domain and use a suitable interface for 5 V signals unless the exact Espressif documentation for the selected device states otherwise.
Which board is easier for beginners?
The classic Nano is often easier for basic digital and analog exercises because the hardware and software are smaller. ESP32 is approachable through Arduino tools but adds wireless setup, pin restrictions and a more complex runtime.
Which board is better for battery projects?
Either can fit, depending on the duty cycle and board design. Compare measured complete-board current in every state, including regulator, LEDs, USB circuitry, sensors and radio activity.
Which has better analog inputs?
Neither should win from resolution alone. Compare the required range, accuracy, noise, linearity, reference, calibration, bandwidth and pin restrictions. An external ADC may be better for demanding measurements.
Can Arduino Nano and ESP32 work together?
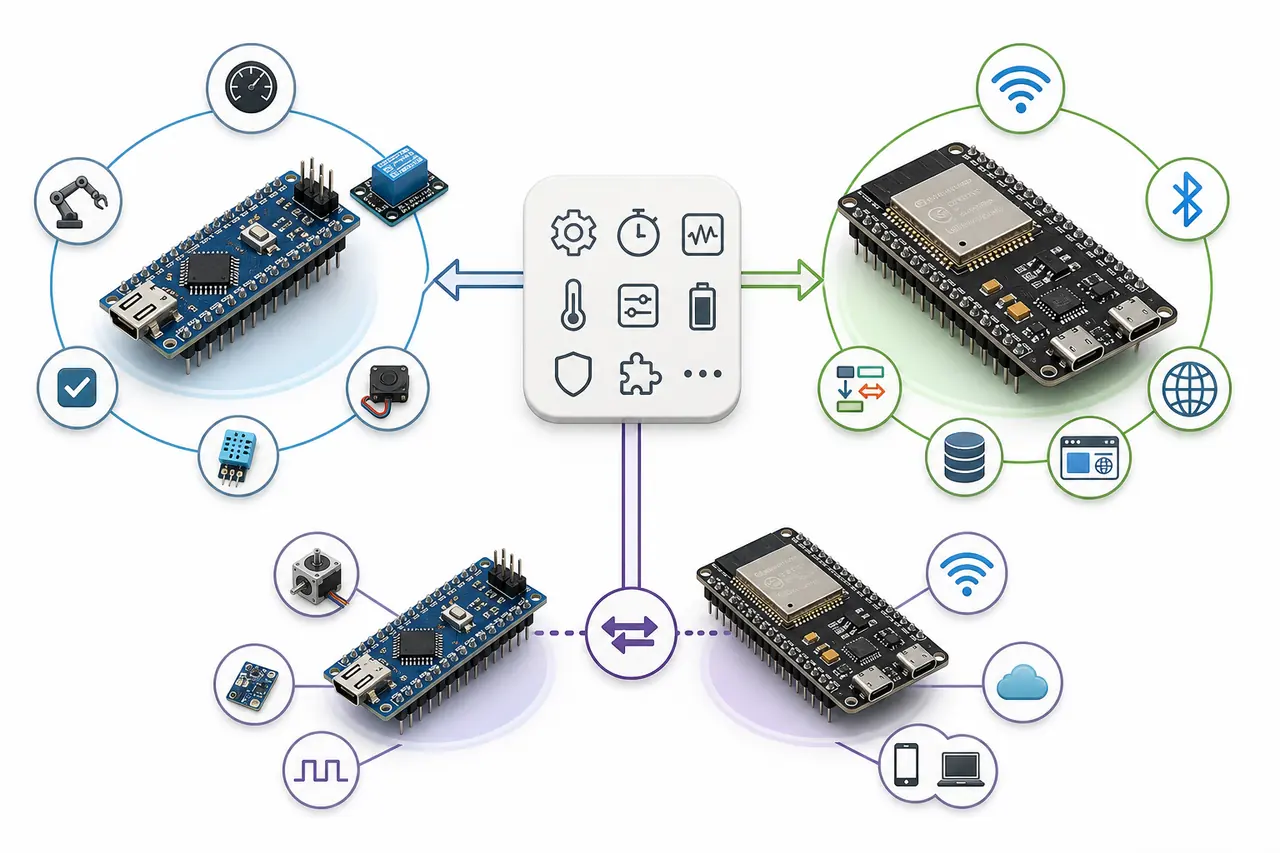
Yes. They can communicate through UART, I2C, SPI or another interface with correct voltage translation and protocol design. Use two controllers only when the separation provides a clear timing, connectivity or maintenance benefit.
Should I use a development board in the final PCB?
A carrier board is practical for low volume and faster integration. Higher-volume or space-constrained products may benefit from a module or bare MCU, but that adds power, RF, programming, test and compliance work.
Conclusion
For the classic comparison, Arduino Nano favors compact 5 V control and simplicity; ESP32 favors connectivity, memory and concurrent workloads. The most important step is removing ambiguity: choose exact board variants, validate voltage and usable pins, measure whole-board power, and test the software behavior that matters.
If you want Nano mechanics and ESP32 capability, evaluate Arduino Nano ESP32—but treat it as a 3.3 V ESP32-S3 board, not as an electrically identical classic Nano. If one board cannot satisfy both deterministic control and wireless complexity cleanly, a documented two-controller architecture may be better than forcing every function into one device.



0 Comments